How to install DBLab using the AWS Marketplace
If you're using AWS, installing DBLab from the AWS Marketplace is the fastest way to get database branching for any database, including RDS and RDS Aurora. It is not limited to RDS: any Postgres or Postgres-compatible database can serve as a source for DBLab.
Currently, only the "logical" mode of data retrieval (dump/restore) is supported – the only available method for managed Postgres cloud services such as RDS Postgres, RDS Aurora Postgres, Azure Postgres, or Heroku. "Physical" mode is not part of the Marketplace setup flow; switching an instance to it requires editing the config file directly. On an instance already in physical mode, DBLab Engine 4.2+ lets you edit the WAL-G and pgBackRest settings in the UI Configuration page's Expert mode. More about various data retrieval options for DBLab.
Check out the DBLab installation tutorial: Database Lab tutorial for Amazon RDS
Prerequisites
- AWS cloud account
- SSH client (available by default on Linux and macOS; Windows users: consider using PuTTY)
- A key pair already generated for the AWS region that we are going to use during the installation. Both RSA and ed25519 will work. If you're not familiar with the process of creating a key pair in AWS, read their documentation: "Create key pairs".
Steps to install DBLab Engine from AWS Marketplace
The first steps are trivial:
- Log in to AWS: https://console.aws.amazon.com/
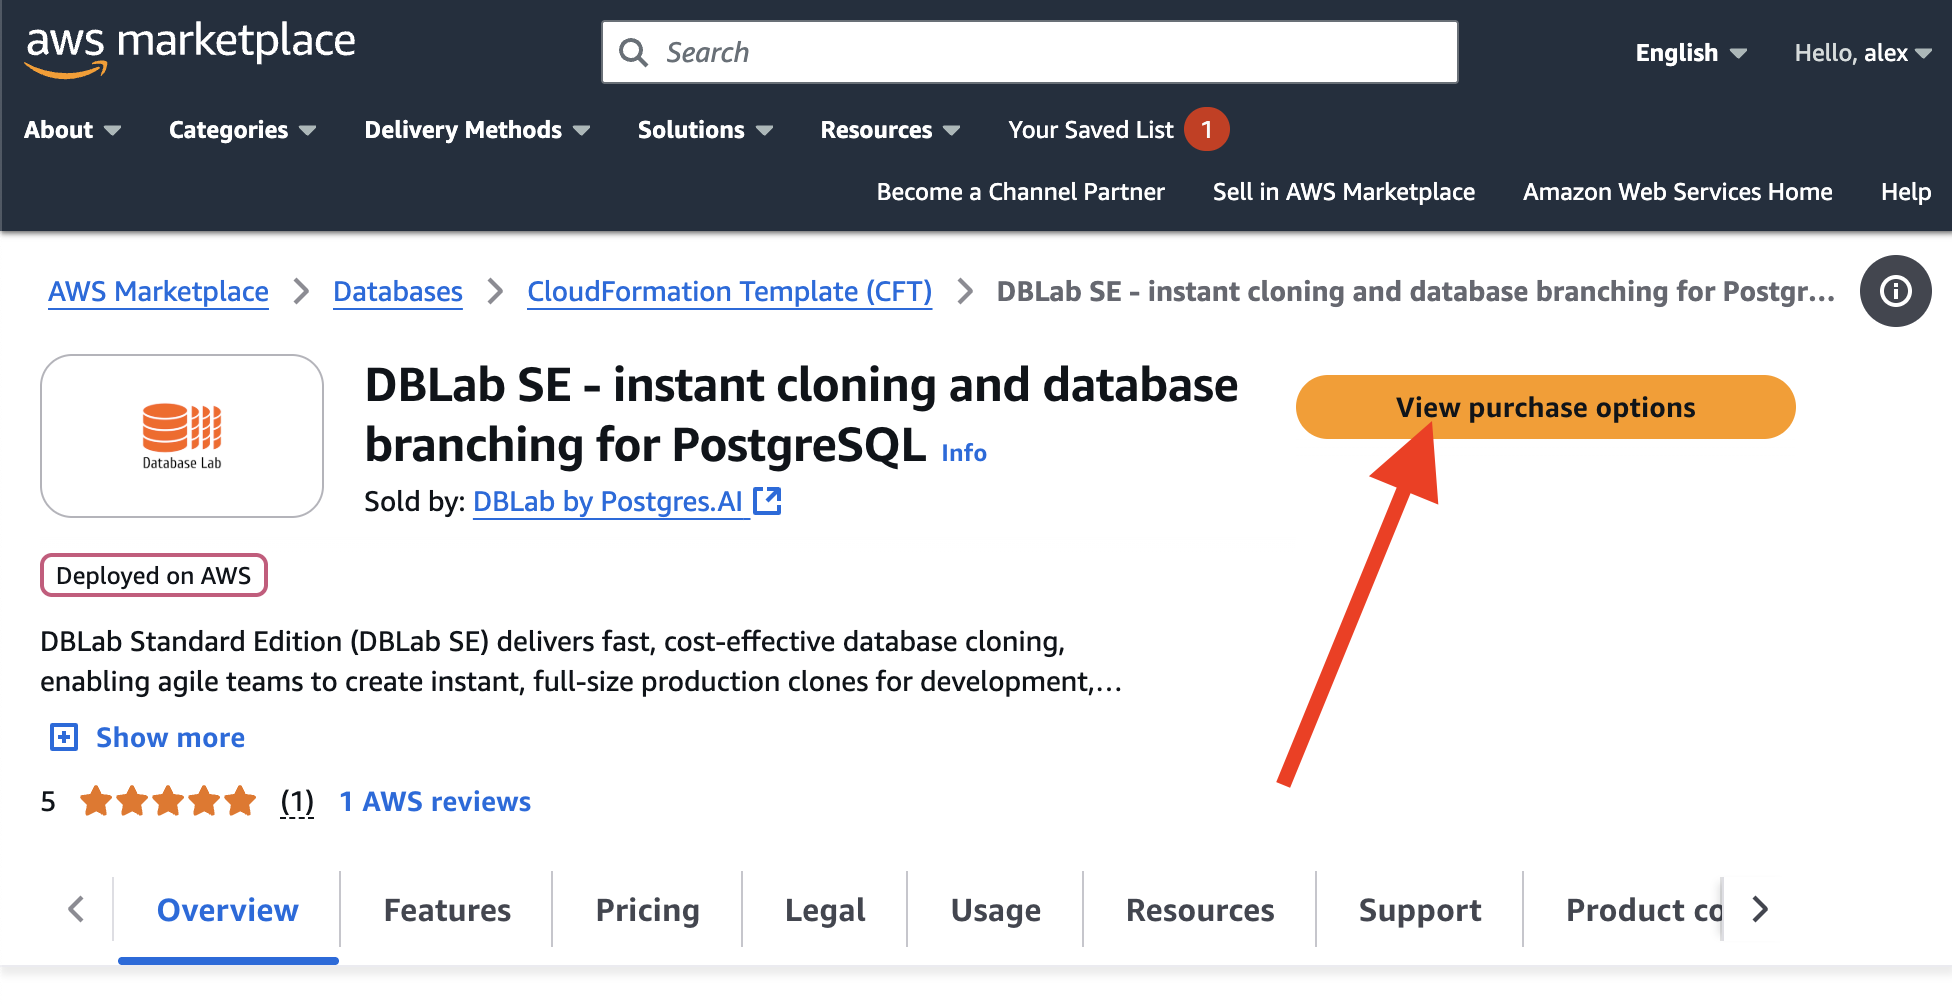
- Open the DBLab on AWS Marketplace page
And press the "View purchase options" button:
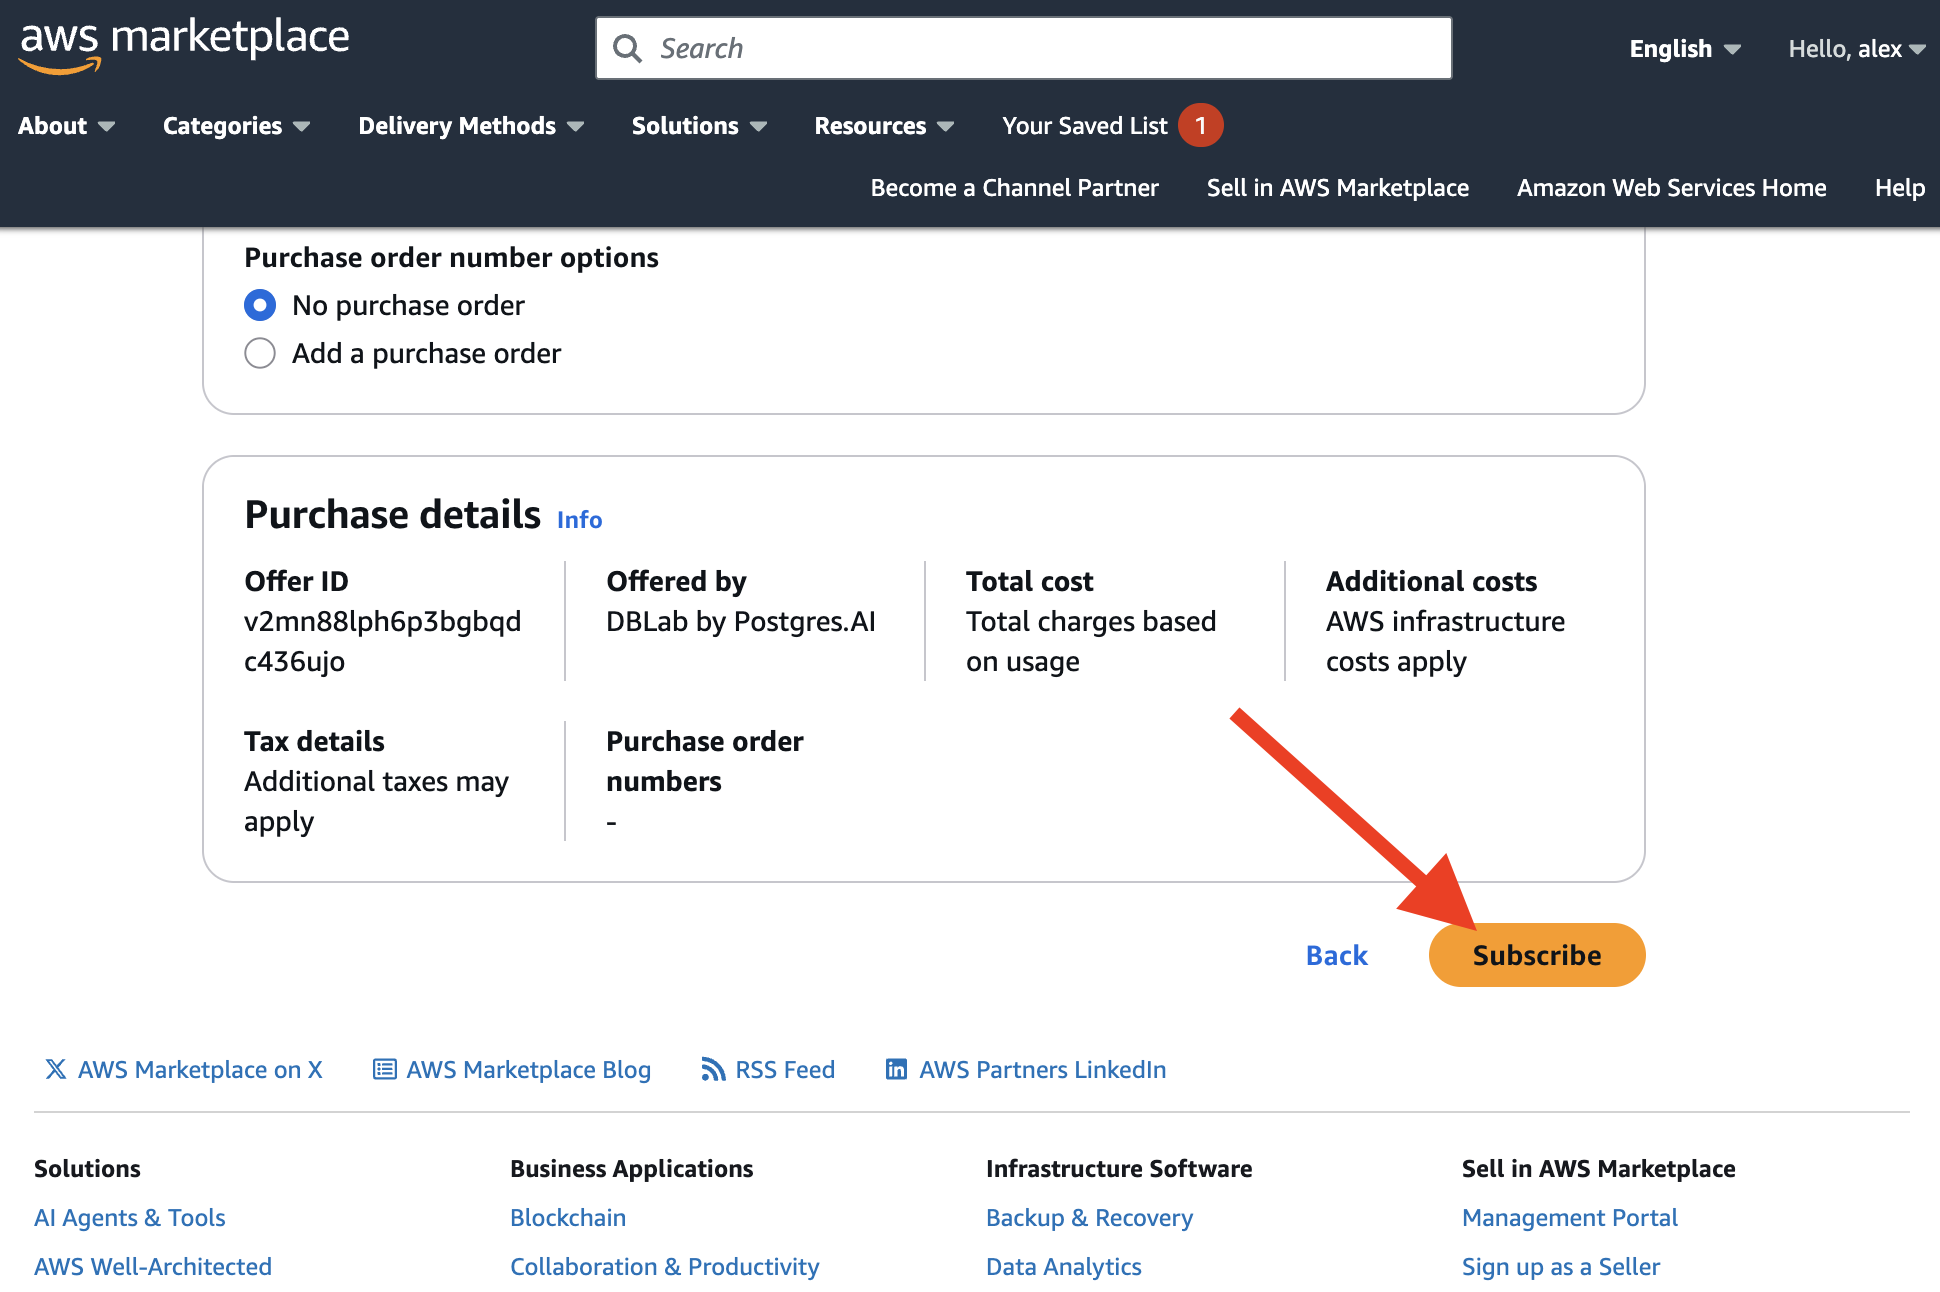
Then, press "Subscribe":
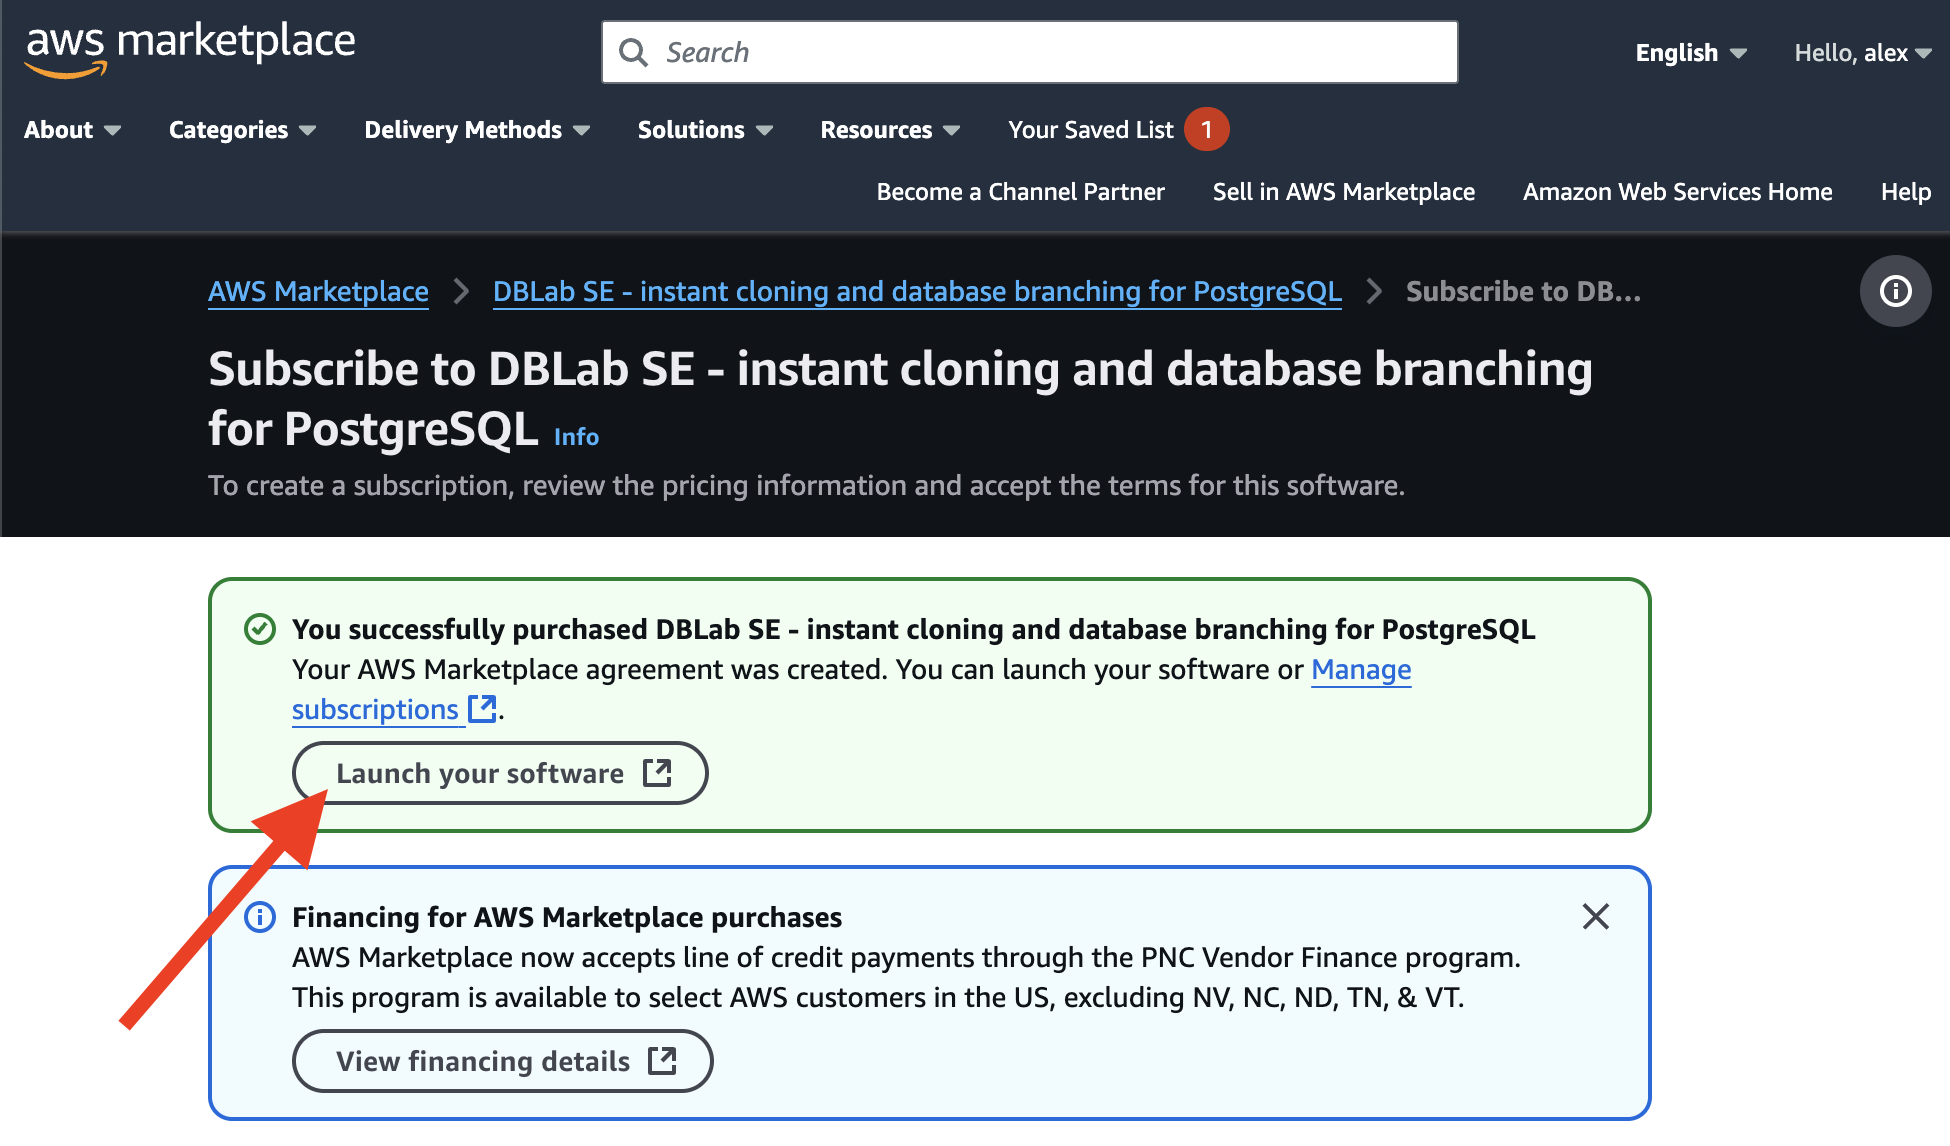
Next, press "Launch your software":
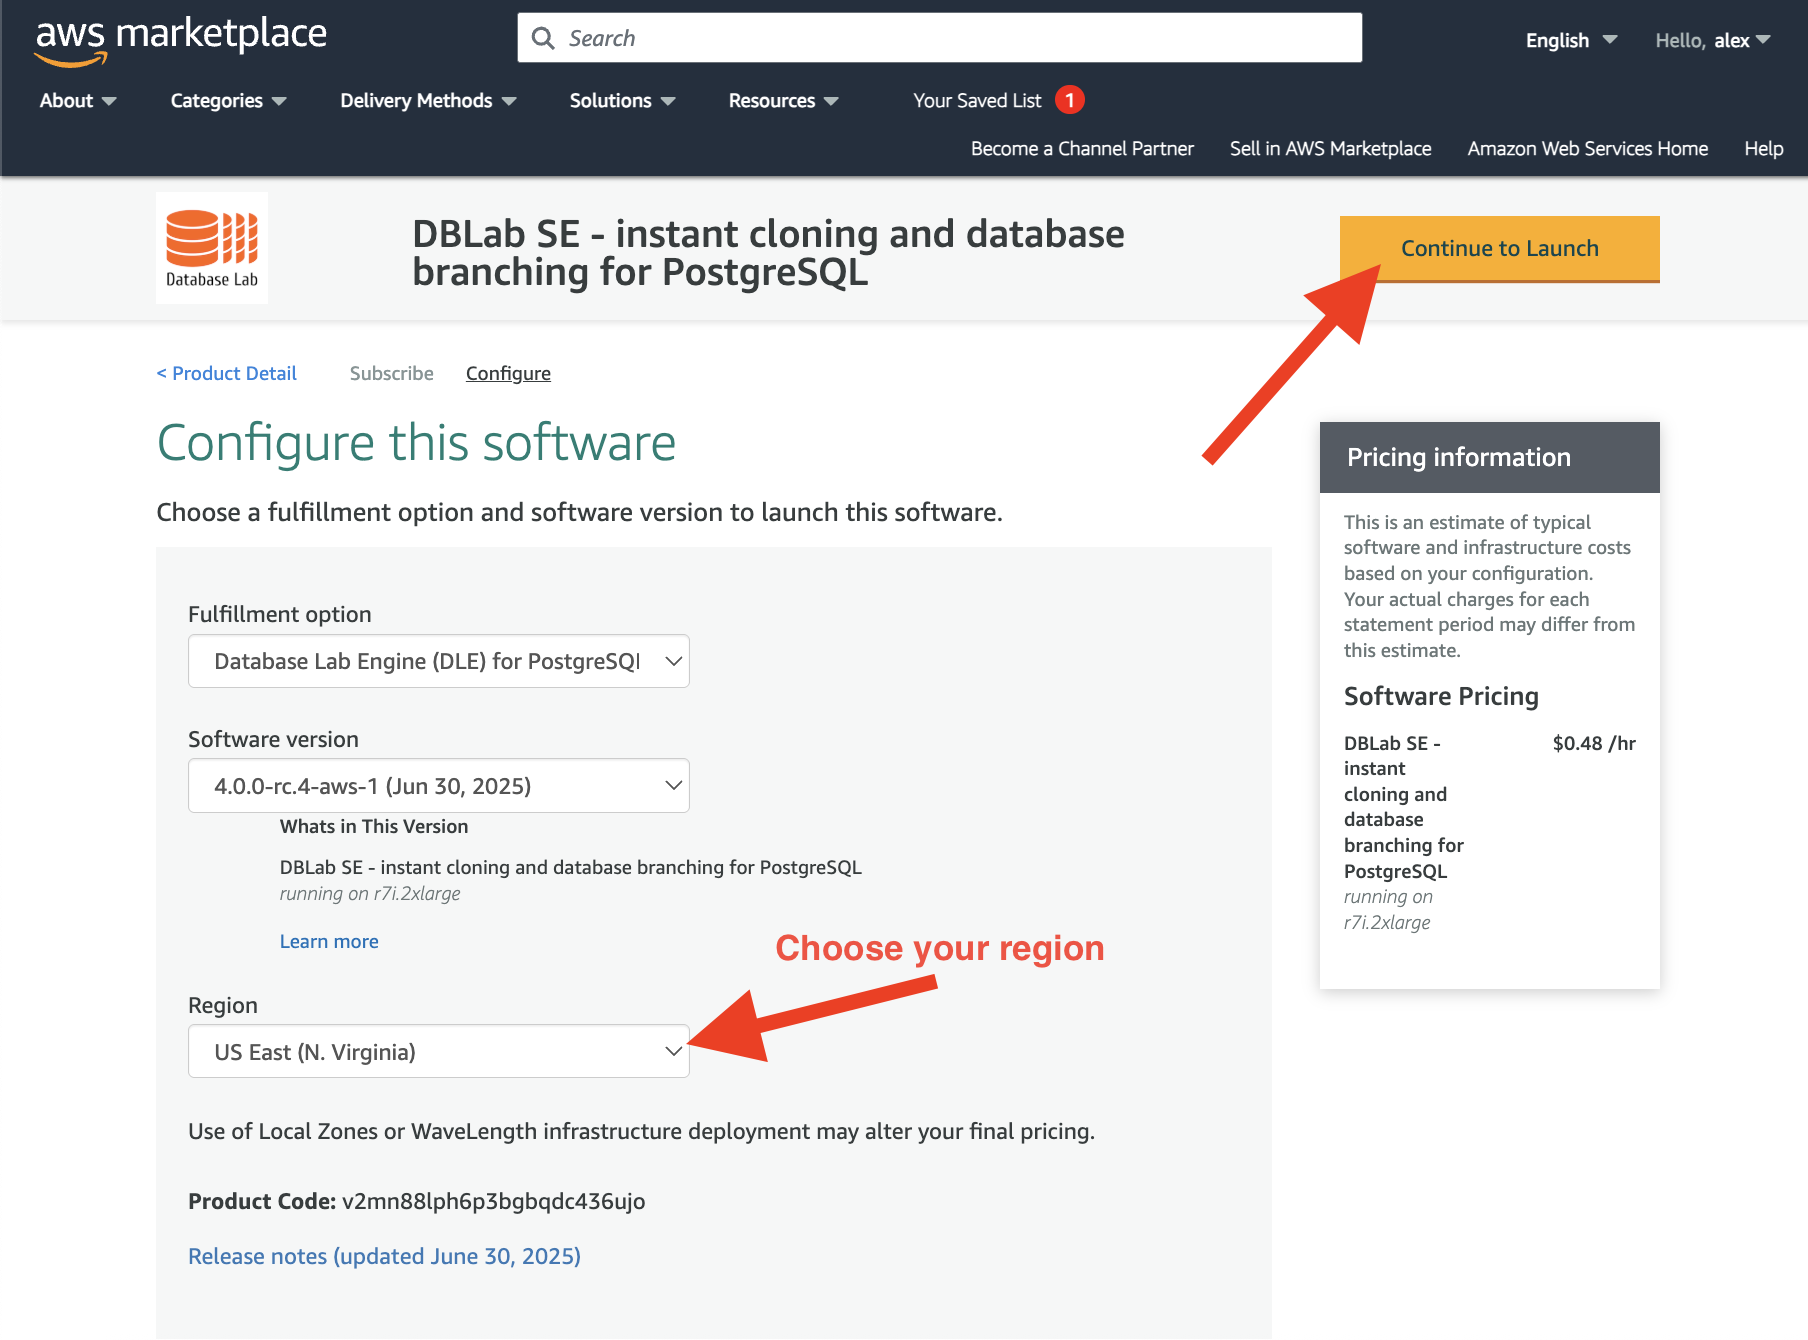
Now, check that the DBLab Engine version (the latest is recommended) and the AWS regions are chosen correctly, then press "Continue to Launch":
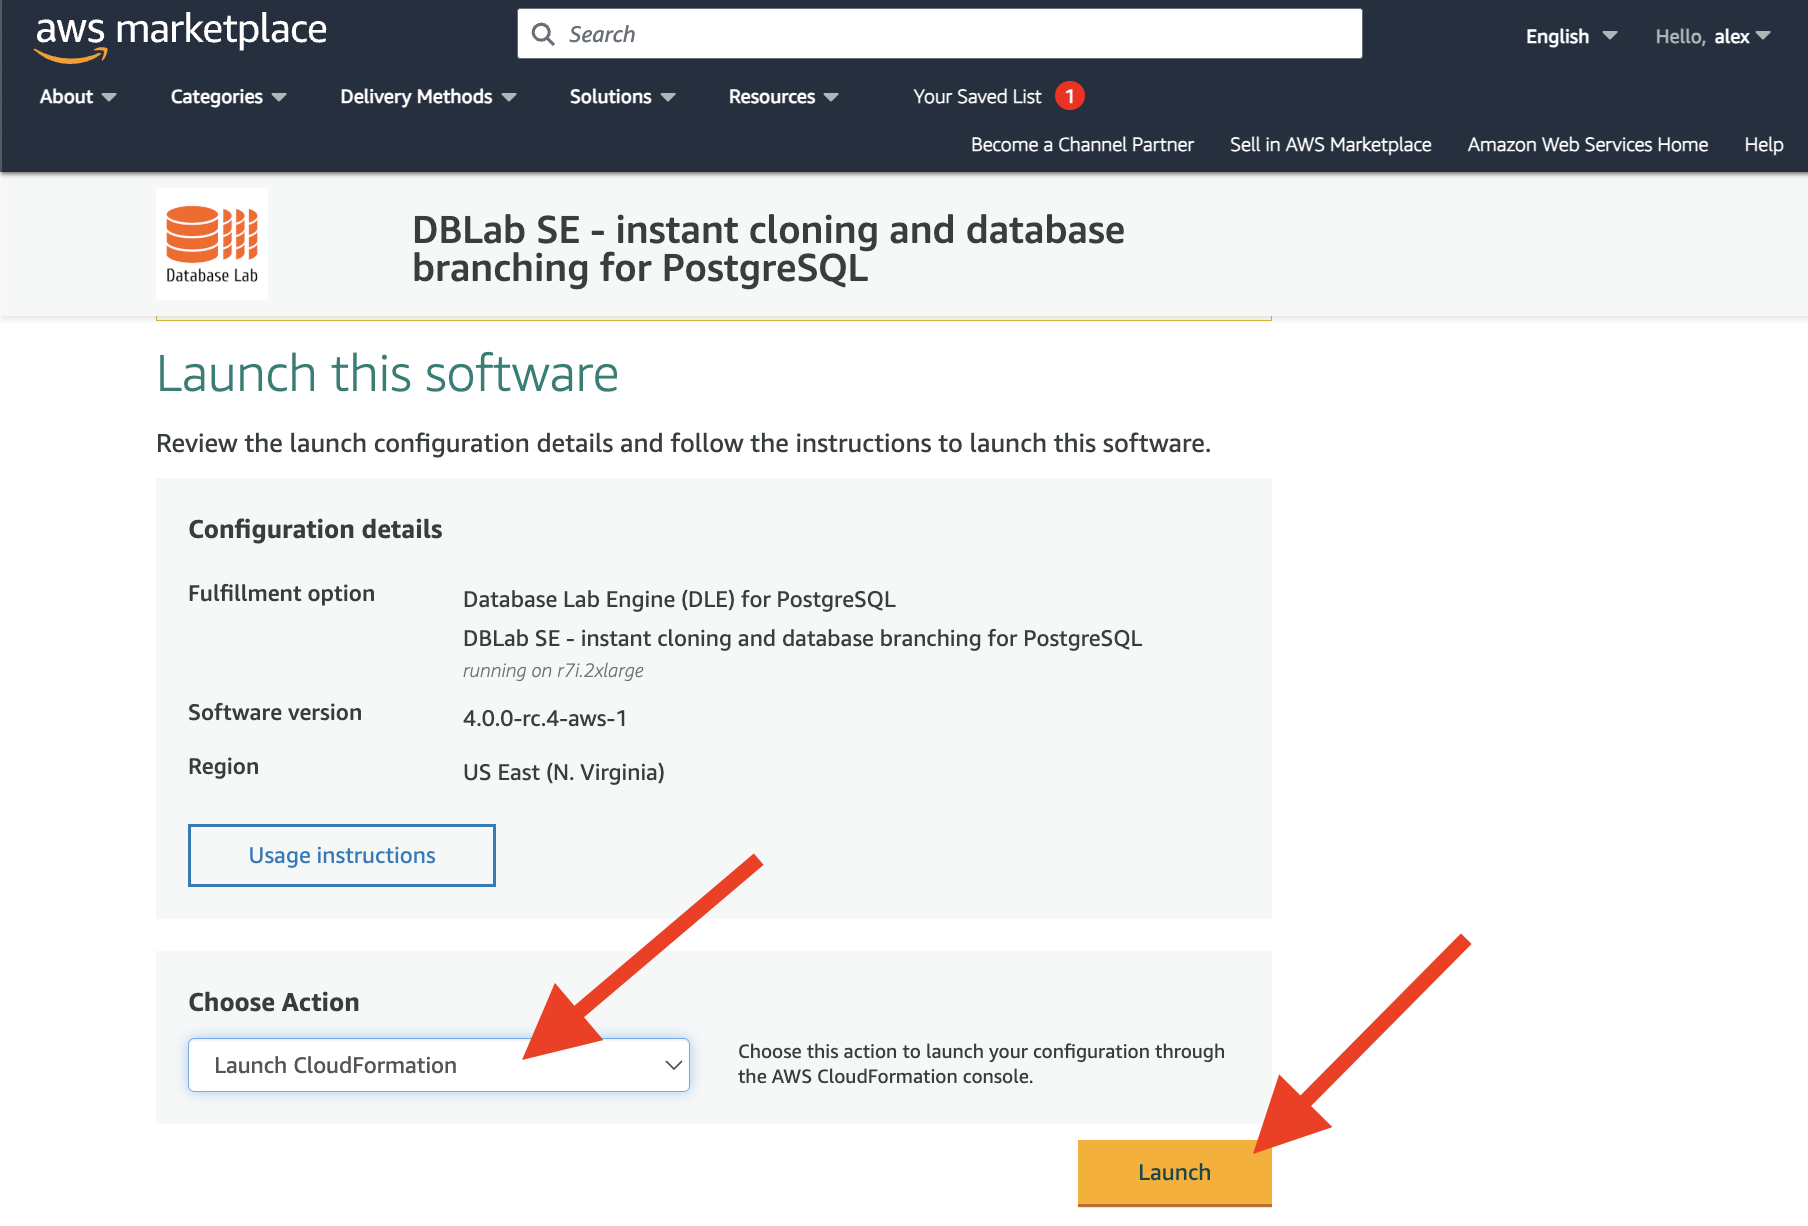
On this page you need to choose "Launch CloudFormation" and press "Launch":
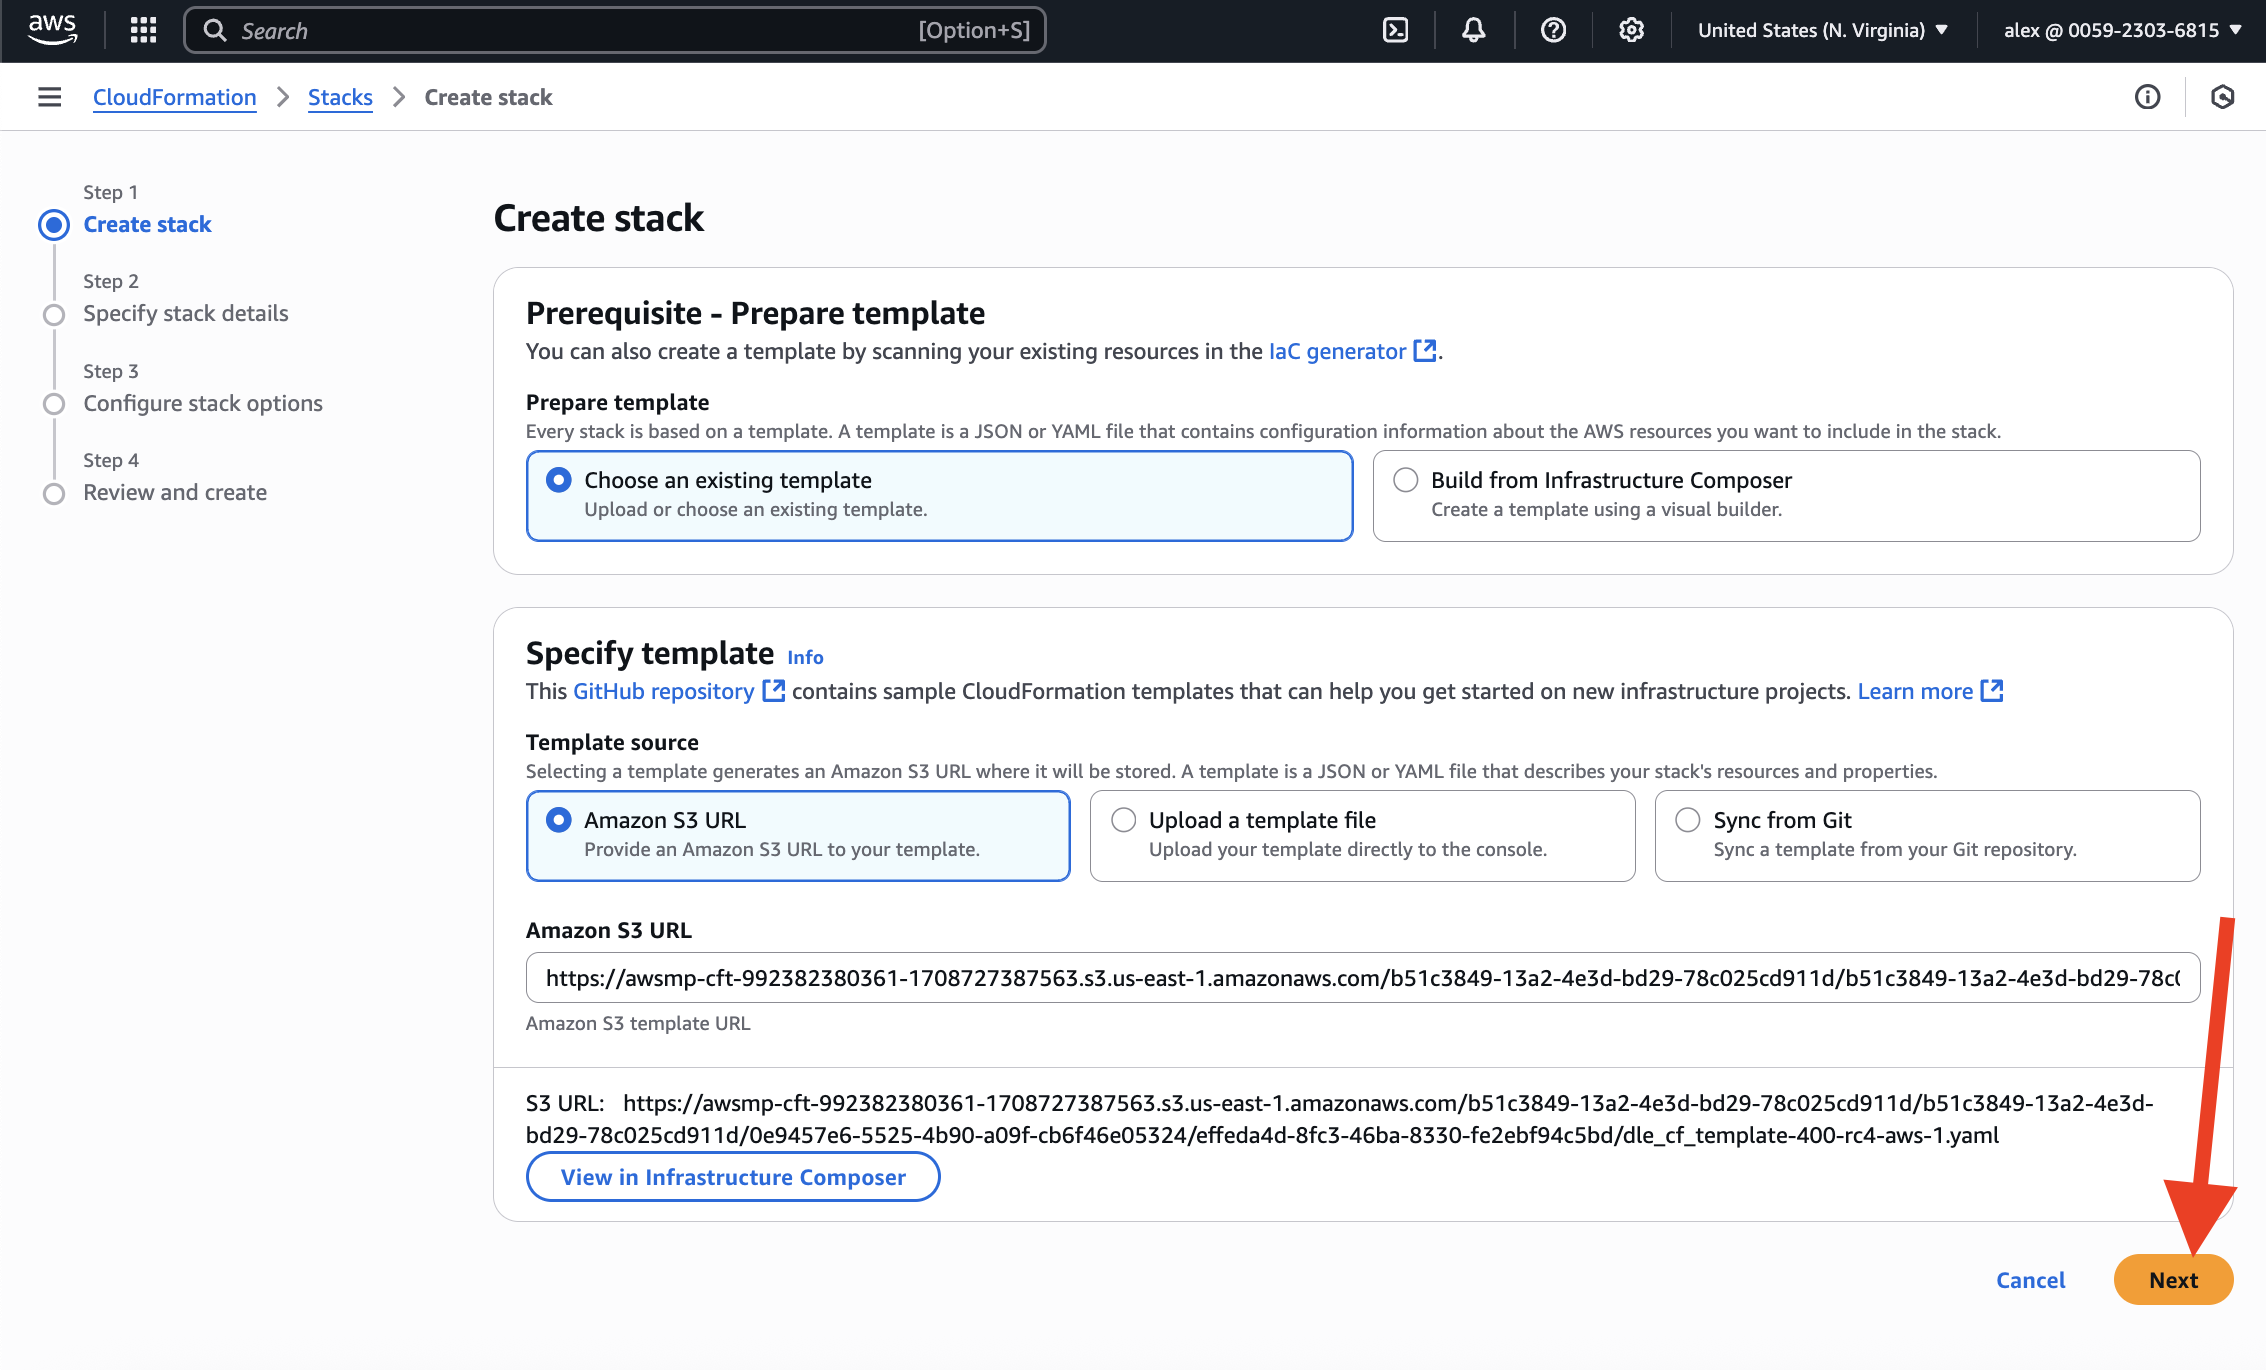
This page should be left unmodified, just press the "Next" button:
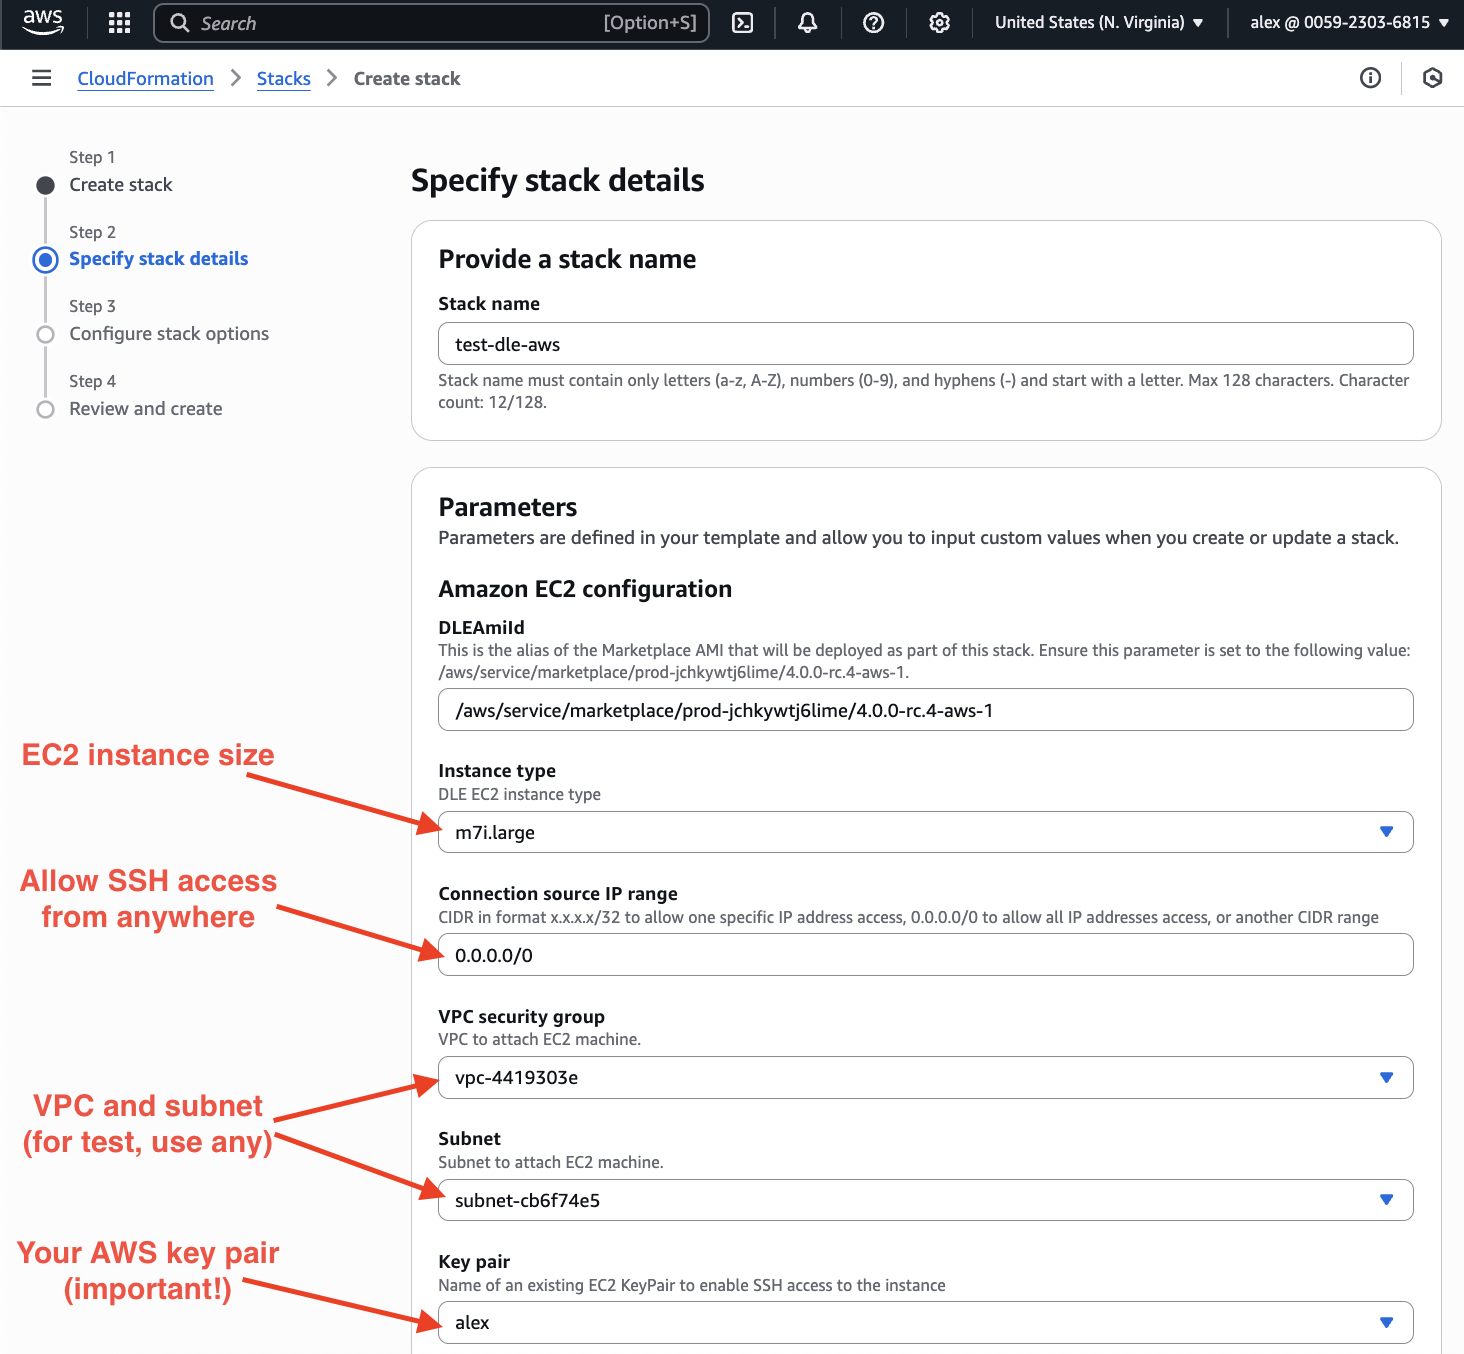
Now, it is time to fill the form that defines the AWS resources that we need:
- EC2 instance type and size – it defines the hourly price for "compute" (see the full price list);
- subnet mask to restrict connections (for testing, you can use
0.0.0.0/0; for production use, restrict connections wisely); - VPC and subnet – you can choose any of them if you're testing DBLab for some database which is publicly available (the only thing to remember: subnet belongs to a VPC, so make sure they match); for production database, you need to choose those options that will allow DBLab to connect to the source for the successful data retrieval process;
- choose your AWS key pair (has to be created already).
Next, on the same page:
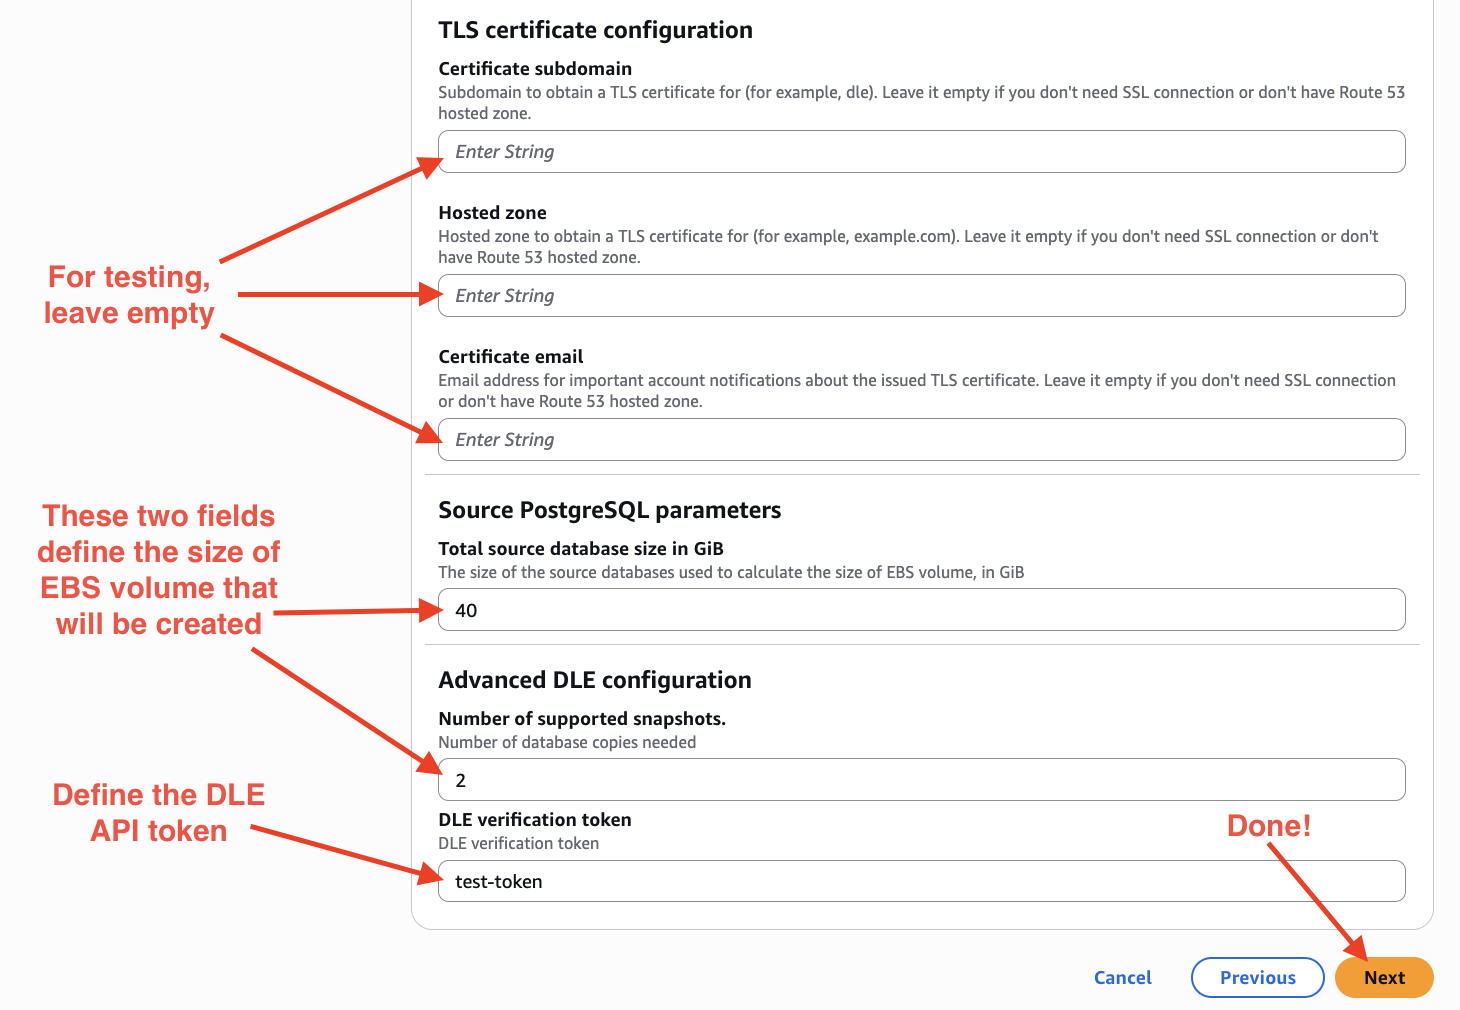
- define the size of EBS volume that will be created (you can find pricing calculator here: "Amazon EBS pricing"):
- put as many GiB as roughly your database has (it is always possible to add more space without downtime),
- define how many snapshots you'll need (minimum 2);
- define secret token (at least 9 characters are required!) – it will be used to communicate with DBLab API, CLI, and UI.
Then, press "Next".
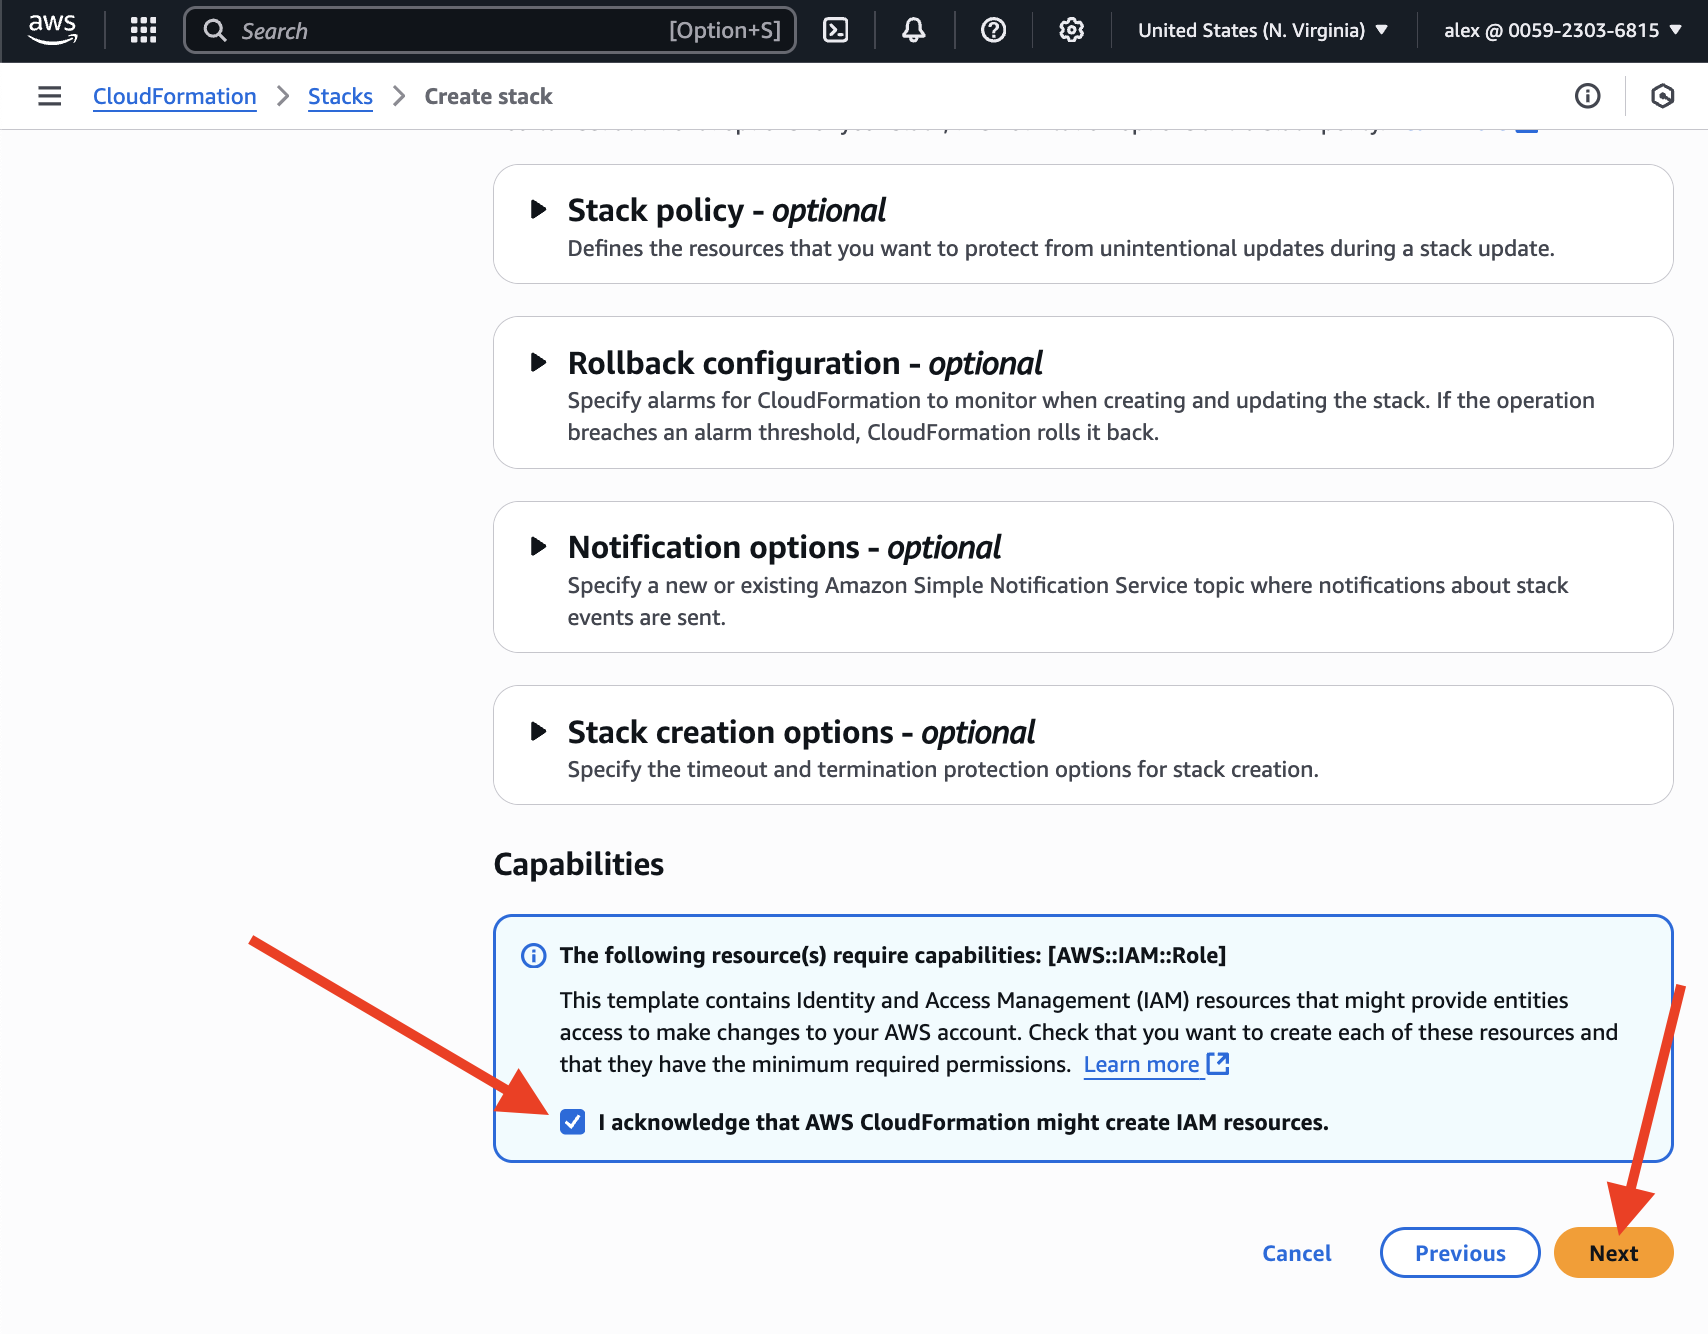
At the bottom of the next page acknowledge that AWS CloudFormation might create IAM resources. Then, press the "Next" button:
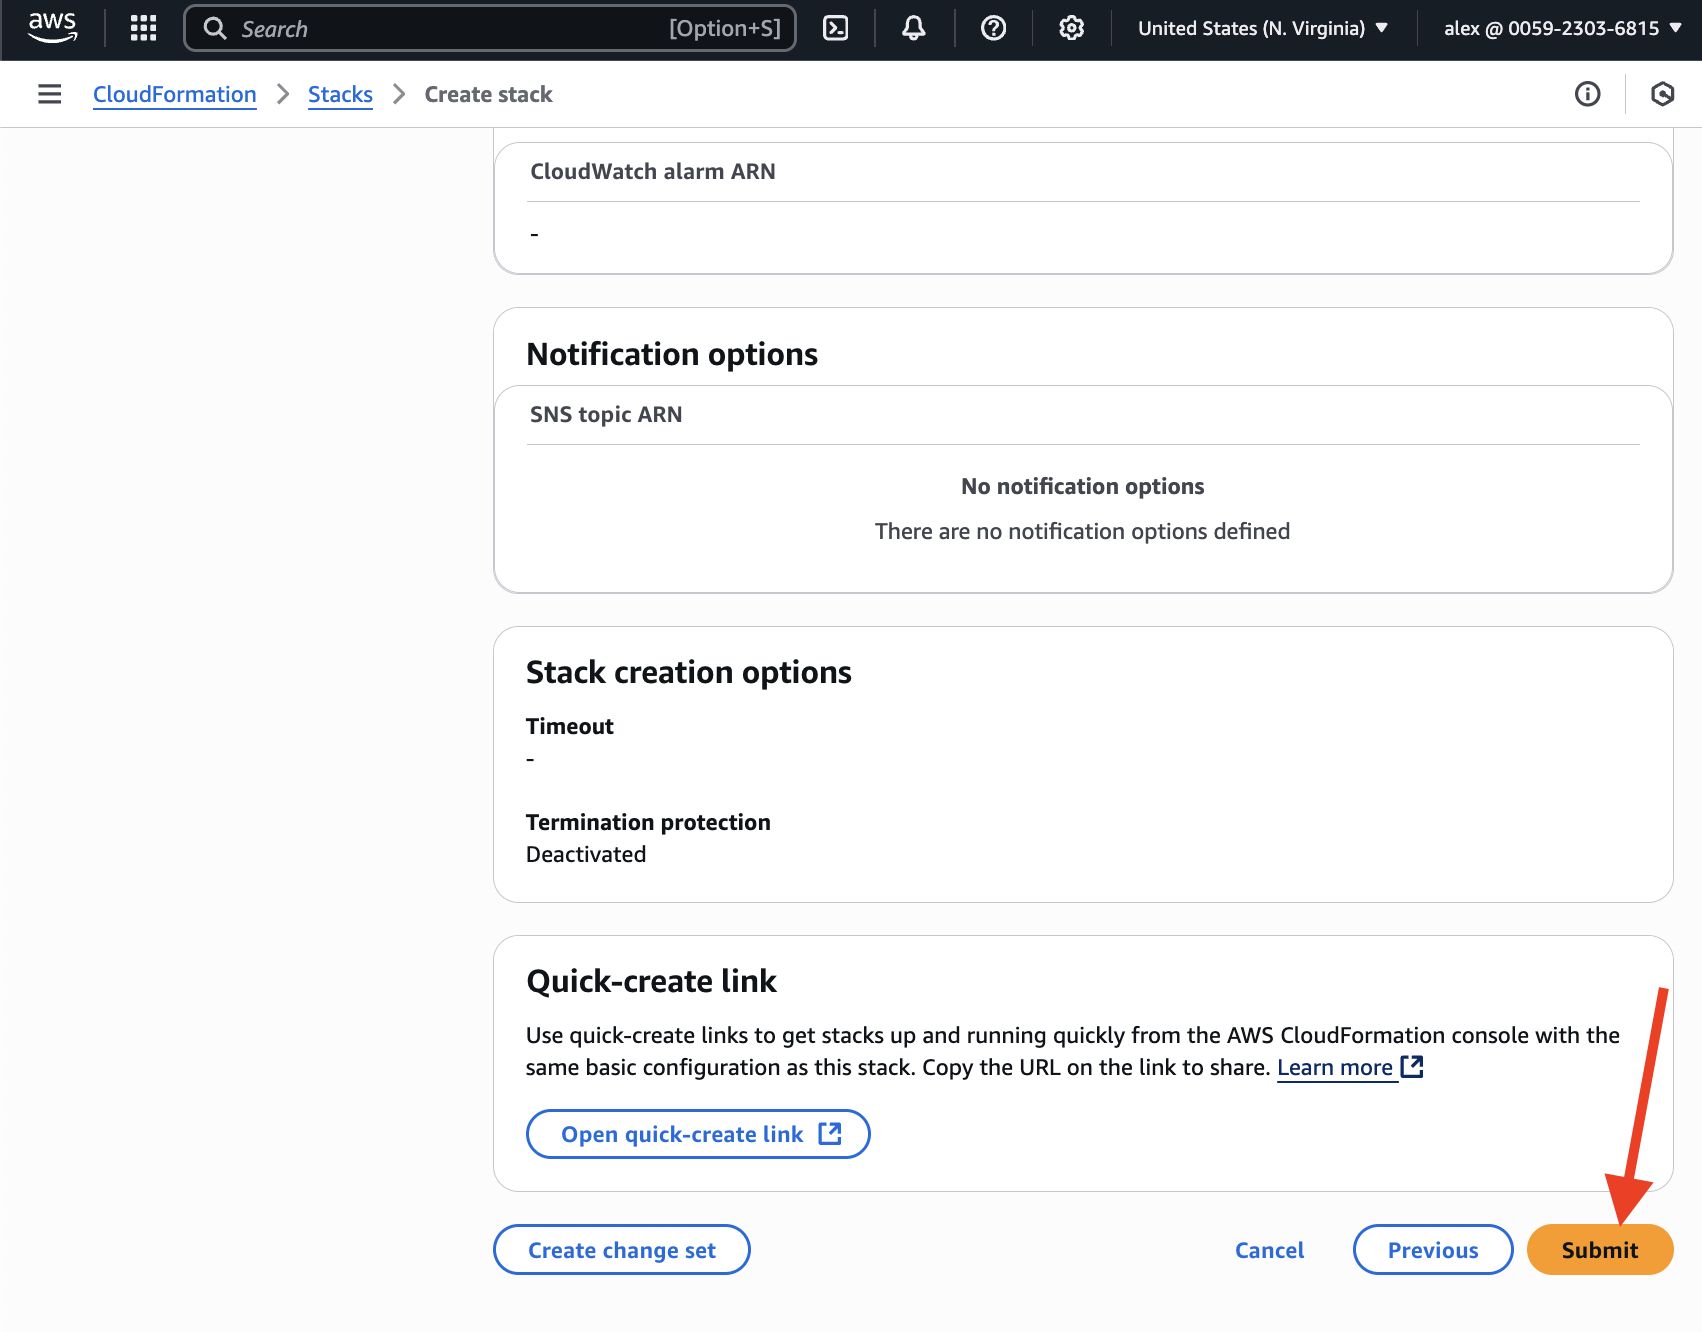
Once you've pressed "Submit", the process begins.
You need to wait a few minutes, while all resources are provisioned and DBLab setup is complete. Check out the "Outputs" section – once DBLab API and UI are ready, you'll see the ordered list of instructions on how to connect to UI and API.
Note that the initial data retrieval can be long – it depends on the size of the source database(s). However, DBLab API, CLI, and UI are available for use while it is happening. Once the retrieval is finished, DBLab is ready for use.
Private VPC deployment
By default the stack creates a public deployment: an Elastic IP, SSH from the "Connection source IP range", and access to the UI, API, and clones through SSH port forwarding. The "Private network" group of launch parameters changes this. Every parameter is optional; a new launch with the defaults behaves as described above. Updating an existing stack to this template version replaces its instance, so plan it as a replacement (see below). An instance created by an older template version kept its DBLab configuration on the root volume; after such a replacement the configuration is rebuilt from the image defaults with the stack's settings applied (verification token, access mode, DNS name), and the source database settings must be entered again in the UI. Existing snapshots stay available; the next data refresh overwrites a dataset other than the current one, as it always does.
| Parameter | Default | Effect when set |
|---|---|---|
| Public access | true | false: no Elastic IP and no public IP address. The instance is reachable only from inside the VPC. Let's Encrypt certificates are not available in this mode, so the UI and API are served over plain HTTP. |
| Allow internal access | false | true: DBLab accepts connections from your network without an SSH tunnel: the UI and API on port 2346, clone databases on ports 6000 to 6099. Requires a real "DLE verification token"; the launch is refused with the example value. Clone connection strings use the private DNS name if set, otherwise the private IP; if a TLS certificate domain is configured, that public name takes precedence. |
| Internal access CIDR 1 to 5 | empty | Private CIDR ranges (10/8, 172.16/12, 192.168/16, 100.64/10) allowed to reach those ports. Used when "Allow internal access" is true and the stack creates the network interface; at least one is required in that case. |
| Existing network interface | empty | ID of a network interface (eni-...) you created in the selected subnet. The instance uses it as its primary interface. The stack does not manage that interface's security groups: allow inbound TCP 22, and 2346 plus 6000 to 6099 for internal access, there yourself. With "Public access" left on, the stack's Elastic IP is attached to your interface. Cannot be combined with a TLS certificate; that path needs a stack-created interface. |
| Private hosted zone / Private record name | empty | Creates an A record with that name in the private Route 53 zone, pointing at the instance's private IP. The zone must already be associated with the VPC. Set both or neither. |
| Instance generation (in the "Advanced DLE configuration" group) | 1 | Change it to replace the instance while keeping the network interface and data volume. Also the only way to apply a changed verification token, internal access setting or DNS name: those are applied on an instance's first boot, and an in-place stack update does not re-run it. See below. |
The stack now creates the instance's primary network interface as a separate resource that outlives the instance, whether or not the private parameters are used. The private IP, and the Elastic IP when public access is on, therefore stay the same across instance replacements.
Egress
A private instance still needs outbound access during first boot and after a replacement: to registry.gitlab.com and Docker Hub for container images, which are public hosts and need a NAT gateway, and to the AWS CloudFormation endpoint, where the instance reports its readiness; that one can also be a VPC interface endpoint. Without egress the launch fails within minutes if the CloudFormation endpoint is still reachable (the instance reports the failure itself); otherwise the stack rolls back after the 30-minute timeout.
SSH access is unchanged by these settings: port 22 stays open to the "Connection source IP range", and with public access off that range must be reachable from inside the VPC, for example a bastion host or a VPN subnet. SSH port forwarding to the UI, API, and clones therefore keeps working on a private instance even with internal access off.
Data durability and instance replacement
This applies to every stack created from this template version, public or private.
What lives where
The ZFS pool is on the separate data volume, mounted at /var/lib/dblab/dblab_pool as before. Since this template version the DBLab configuration, metadata, and logs are on that volume too, in a dataset of their own (dblab_pool/state, mounted at /var/lib/dblab/state). The root volume holds only the operating system and Docker. Terminating the instance loses only what the first boot recreates: running clone containers, Netdata history, the TLS certificate (re-issued on the new instance), and the local dblab CLI profile.
Replacing the instance
Use this procedure when the instance has failed or when you want a different instance type. A new DBLab version is a new template file (the image is part of the template), so for an upgrade, and for moving a stack created by an older template version to this one, do step 1, then update the stack with the new template file and leave "Instance generation" unchanged: the template change itself replaces the instance.
Procedure:
- Terminate the old instance in the EC2 console. This releases the network interface and the data volume. Stopping is not enough.
- Open the stack in CloudFormation, choose Update, keep the current template (or supply the new one for an upgrade), and increase Instance generation. Change the instance type at the same time if needed.
- CloudFormation launches a new instance on the same network interface and data volume. The first-boot script imports the existing pool instead of creating one, and the update completes once DBLab is up. In our test this took under three minutes; a fresh launch takes about five. The instance reports failure itself if DBLab is not up about 12 minutes after the bootstrap reaches it, and CloudFormation gives up at 20 minutes at the latest; either way the update is rolled back, so check the instance's system log rather than waiting.
What survives: all datasets and snapshots, the configuration, the verification token, and the instance identity, at the same private IP and DNS name. The subnet cannot be changed to one in another Availability Zone; the stack refuses such an update, because the data volume is bound to its zone. Note that DBLab runs its start-up data refresh on every engine start unless skipStartRefresh: true is set in the configuration: after a replacement all datasets are free of clones, so the source database is dumped right away into a dataset other than the current one (the older one with the default two datasets). Expect the corresponding load on the source, and note that creating clones is refused with a "dataset of the branch" error until that refresh has finished; a few minutes for a small database.
What does not survive: running clones. Clone databases are containers on the old instance, and DBLab does not recreate them on a new host; their datasets are removed on the first start. Create fresh clones from the existing snapshots afterwards. A clone's own snapshots (dblab snapshot create --clone-id ..., or the UI equivalent) are removed together with its dataset. The exception is a clone from whose snapshot a branch or another clone was created: that clone's dataset stays on disk as an orphan, and a new clone with the same ID is refused until it is gone. It cannot be removed on its own, since zfs destroy -R would also destroy the dependent branch or clone; delete those through DBLab first, then run zfs destroy -r <pool>/branch/<branch>/<clone>, or keep the orphan.
If the replacement itself fails, for example because the new instance cannot reach the container registry, CloudFormation tries to roll back to the old instance, which you terminated in step 1, and the stack ends in UPDATE_ROLLBACK_FAILED. Choose Continue update rollback and skip the DLEInstance resource, fix the cause, then run the update again.
Setup demonstration
Troubleshooting
To troubleshoot:
- Use SSH to connect to the EC2 instance
- Check the containers that are running:
sudo docker ps - Check the DBLab Engine container's logs:
sudo docker logs dblab_server - If needed, check Postgres logs for the main branch. They are located in
/var/lib/dblab/dblab_pool/dataset_1/data/logfor the first snapshot of the database, in/var/lib/dblab/dblab_pool/dataset_2/data/logfor the second one (if it's already fetched); if you've configured DBLab to have more than 2 snapshots, check out the other directories too (/var/lib/dblab/dblab_pool/dataset_$N/data/log, where$Nis the snapshot number, starting with1)
Getting support
With DBLab installed from AWS Marketplace, guaranteed vendor support is included – please use one of the available ways to contact.